Tar file install
To install Splunk Enterprise on a Linux system, expand the tar file into an appropriate directory using thetar command:
tar xvzf splunk_package_name.tgzThe default install directory is
splunk in the current working directory. To install into /opt/splunk, use the following command:
tar xvzf splunk_package_name.tgz -C /optNote: When you install Splunk Enterprise with a tar file:
- Some non-GNU versions of
tarmight not have the-Cargument available. In this case, if you want to install in/opt/splunk, eithercdto/optor place the tar file in/optbefore running thetarcommand. This method will work for any accessible directory on your machine's filesystem. - Splunk does not create the
splunkuser automatically. If you want Splunk to run as a specific user, you must create the user manually before installing. - Ensure that the disk partition has enough space to hold the uncompressed volume of the data you plan to keep indexed.
RedHat RPM install
Ensure that the desired splunk build rpm package is available locally on the target server. Verify that the file is readable and executable by the the Splunk user. If needed change access:chmod 744 splunk_package_name.rpmTo install the Splunk RPM in the default directory
/opt/splunk:
rpm -i splunk_package_name.rpmTo install Splunk in a different directory, use the
--prefix flag:
rpm -i --prefix=/opt/new_directory splunk_package_name.rpmNote: Installing with rpm in a non-default directory is not recommended, as RPM offers no safety net at time of upgrade, if --prefix does not agree then the upgrade will go awry.
To upgrade an existing Splunk Enterprise installation that resides in /opt/splunk using the RPM:
rpm -U splunk_package_name.rpmNote: Upgrading rpms is upgrading the rpm package, not upgrading Splunk Enterprise. In other words, rpm upgrades can only be done when using the rpm in the past. There is no smooth transition from tar installs to rpm installs. This is not a Splunk issue, but a fundamental packaging issue.
To upgrade an existing Splunk Enterprise installation that was done in a different directory, use the
--prefix flag:
rpm -U --prefix=/opt/existing_directory splunk_package_name.rpmNote: If you do not specify with
--prefix for your existing directory, rpm will install in the default location of /opt/splunk.
For example, to upgrade to the existing directory of
$SPLUNK_HOME=/opt/apps/splunk enter the following:
rpm -U --prefix=/opt/apps splunk_package_name.rpmTo Replace an existing Splunk Enterprise installation
rpm -i --replacepkgs --prefix=/splunkdirectory/ splunk_package_name.rpmIf you want to automate your RPM install with kickstart, add the following to your kickstart file:
./splunk start --accept-license
./splunk enable boot-start
Note: The second line is optional for the kickstart file.
Enable Splunk Enterprise to start the system at boot by adding it to /etc/init.d/ Run this command as root or sudo and specify the user that Splunk Enterprise should run as.
./splunk enable boot-start -user splunkuser
Debian DEB install
To install the Splunk DEB package:dpkg -i splunk_package_name.debNote: You can only install the Splunk DEB package in the default location,
/opt/splunk.
What gets installed
Splunk package status:dpkg --status splunkList all packages:
dpkg --list
Start Splunk
Splunk Enterprise can run as any user on the local system. If you run it as a non-root user, make sure that it has the appropriate permissions to read the inputs that you specify. Refer to the instructions for running Splunk Enterprise as a non-root user for more information.To start Splunk Enterprise from the command line interface, run the following command from
$SPLUNK_HOME/bin directory (where $SPLUNK_HOME is the directory into which you installed Splunk):
./splunk startBy convention, this document uses:
-
$SPLUNK_HOMEto identify the path to your Splunk Enterprise installation. -
$SPLUNK_HOME/bin/to indicate the location of the command line interface.
Startup options
The first time you start Splunk Enterprise after a new installation, you must accept the license agreement. To start Splunk Enterprise and accept the license in one step:$SPLUNK_HOME/bin/splunk start --accept-licenseNote: There are two dashes before the
accept-license option.
Launch Splunk Web and log in
After you start Splunk Enterprise and accept the license agreement,1. In a browser window, access Splunk Web at
http://<hostname>:port.
-
hostnameis the host machine. -
portis the port you specified during the installation (the default port is 8000).
2. Splunk Web prompts you for login information (default, username
admin and password changeme) before it launches. If you switch to Splunk Free, you will bypass this logon page in future sessions.How do I switch to Splunk Free?
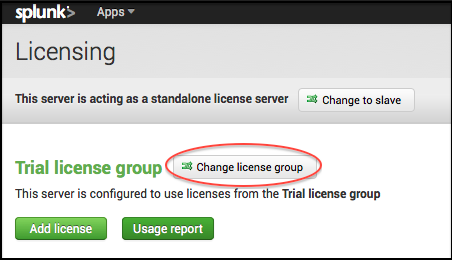
If you currently have Splunk Enterprise (trial or not), you can either wait for your Enterprise license to expire, or switch to a Free license at any time. To switch to a Free License:1. Log in to Splunk Web as a user with admin privileges and navigate to Settings > Licensing.
2. Click Change license group at the top of the page.

3. Select Free license and click Save.
4. You are prompted to restart.
very nice post.keep sharing more posts.
ReplyDeletehadoop admin certification
hadoop admin training